Monday, January 31, 2011

birthday bakery

I made this card for my cousin's 16th birthday...


I used the "Birthday Bakery" hostess level 1 stamp set
which could be yours for hostessing a party of $150 or more...
OR
by taking part in my special (see my post about freebies!).


You can never have too much bling...
I used Stickles and Liquid Applique to bling out and puff up the cakes!


Add some streamers, a metal tag, and verbiage...
and there it is!


Sunday, January 30, 2011

my mom, the new SU! demonstrator!

I have a new recruit!!!
My mother just became a Stampin' Up! demonstrator!!!
We'd like to do classes/workshops together.  What about a mother/daughter stamp camp?!
Interested?
Email me!

Please visit my mom's new blog (which is still a work in progress!)...


proud of my sis-in-law!

I'm so proud of my sister-in-law, Tara!
She's embarking on the papercrafting journey... she sent me this cute card!


I need help convincing her to become a Stampin' Up! Demonstrator!!!

Good job, Tara!


Does anyone else find it funny that our husbands both married redheads?!

"pizza" box notecards

As my husband was eating pizza for lunch, I decided to "play" with my paper to re-create a pizza box.

Here's how it turned out...


I made the box and then made 10 little matching notecards to go inside.
I embellished using the bird punch... aren't they cute?!


So here's what I did...

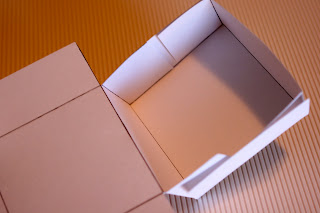
Cut a sheet of cardstock down to 6 1/4" by 11".  On the 6 1/4" side, score at 1 1/2" and 4 3/4" (you do not have to draw lines...I just did so you could see where I scored).


Next, rotate the paper to the 11" side.  Score at 1 1/2", 4 3/4", 6 1/4", and 9 1/2" 
(again, you do not need to draw lines).


Fold all scored lines.  Then cut each "tab" as follows...


At this point, you can use a circle cutter to cut out a shape in the top and adhere a piece of acetate (transparency film) inside of the box to make a window... or you may choose to leave your box plain.

Glue each short "tab" inside of the adjacent long "tabs" (as shown).
I recommend using "Sticky Strip" as it will hold better.


Once you've glued all your pieces, embellish your box any way you'd like.
On my box, I punched out a bird and leaf using the SU! Bird Punch and made a little tag from 2 circle punches and the Designer Label punch.


The final box is 3 1/4" square and 1 1/2" tall.


I made 10 little notecards to match the outside of the box.  
The box will hold 10-12 3"x3" notecards plus envelopes (which are 3 1/8" square).


Email me or shop my Stampin' Up! store to purchase any of the items I used to make this cute gift!


Tuesday, January 25, 2011

i've discovered


What a cool way to document your daily life?!  

As a scrapbooker (which reminds me... I've GOT to start doing it more...again!), I'm addicted to pictorally (is that a word?) documenting my life.  Now I must say that the cool papers and embellishments aren't excluded from the allure!  Duh, that's the best part!

Here's the photo I just uploaded.  I know... it looks way too familiar.  It's the only one I had on my laptop's desktop and it was much easier than perusing iphoto or Aperture to find another!  Plus, I was way to anxious too "play" than to go and take a picture.  Um, though isn't that the point?  Anyway...


Anyone who knows me can tell you that I pretty much always have my DSLR hanging from my neck.  I took over 3000 pictures just in the 12 days we were in the Dominican Republic last July for our wedding!!!  I did narrow them down though... who needs 36 pictures of a tree?!

Gotta go play with my new discovery now!

been waiting...

Stampin' Up! Sale-A-Bration

It's HERE!  SALE-A-BRATION starts today!  Get your free stamps NOW!

Saturday, January 22, 2011

there's no place like home...or a craft room


We just recently moved into a new house and I've spent many 
hours organizing and re-organizing my craft space.
My husband so graciously gave me a "spot" in his "man cave"
(AKA, the basement)...

This is where I "live"... 


Is it wrong that the associates at the "Container Store" know me by name?


This cart was actually designed to hold a mini-fridge...
I think it makes a great place for the printer and 
give me drawers for organizing!


The paper holders were cheap and came from "Target".


I love the look of these glass cracker jars...again "Container Store".
But I think I need to find a way to organize my ribbon in a better way...


I recently took all of my old Stampin' Up! sets off of the wooden blocks
and put them in the new clear mount stamp containers.  
I'm still working on labeling all of them.


These kitchen rods from "Ikea" are fabulous for displaying punches!
I do feel bad for anyone who doesn't have an Ikea close by!


These magazine racks make awesome paper holders!
Again from the "Container Store".


These cube shelving systems are also from "Ikea".
I store all of my jewelry-making and knitting stuff in them,
as well as more stamping/scrapbooking supplies.
My sewing/embroidery machine was a gift from my grandmother
for my birthday last year...love!


Next to my crafting space is this piece of furniture.

My husband calls this a "pool" table...

...I call it a "crafting" table!


I'll post more pics when I get everything finished!


Friday, January 21, 2011

inspiration to a "tea"


I like the graphic design details on the bottle of my favorite beverage...
thus, my inspiration for this card.


I also love the embossed geisha girl and the flower from the new
"Nature Walk" set from the Occasions Mini catalog.


See my Stampin' Up! store for ordering!

valentine treat container holder


Gotta love Cincinnati weather! ANOTHER snow day...  
I think teachers may enjoy snow days even more than the kids!

Here is a cute idea for Valentine treats.  
It's a little "bag" that holds 3 plastic containers.  


Super-easy to make!  Want to know how?

definitely decorative


I received a SU! definitely decorative "P" (for Portney) with my demo kit.  
I "sandwiched" it between the 2 pieces in a frame I picked up from...
Where else?  Target!


Love!

You too can have one of these!

Tuesday, January 18, 2011

valentine "sour cream" treat favors


Have you ever ordered chili or a baked potato at Wendy's and received 
a cute little triangular container of sour cream? 

Here's a great take on that...

These little Valentine favors can be filled with all kinds of different treats
(chocolates, candy, etc.).


Start with a 12 x 12 sheet of Designer Series Paper from Stampin' Up!
I think the "Love Letter" DSP (117162) is so beautiful!

Cut sheet into 6" x 6" squares
(4 favors can be made from 1 12 x 12 sheet of paper)

You can leave the paper the way it is or you can punch a hole for a window.
I used the "Designer Label Punch" (119862)...
the cutout from this punch doubled as a tag when I was finished.
Any shape punch could be used, however.

If you decide to punch a hole, use the sticky strip to attach acetate...
"Medium Window Sheets" (114323) works great for the window.


Add glue on one end of the sheet of paper...
I actually find the "Sticky Strip" tape (104294) to work the best. 
Roll it up and attach...should resemble a toilet paper roll.


Flatten one end of the roll and add sticky strip to close.


Fill the favor with desired candy and close. 
Flatten the end in the opposite way (running perpendicular)
from the other end.

Another GREAT tool with lots of uses is the "Crimper" (101618).
Use this tool to crimp both ends of the favor
(to resemble the sour cream container).

Punch a small hole in the end and add ribbon and a tag
and, voila! The finished project!


Do you live in the Cincinnati area?
Would you like to make these in person at a workshop?
Interested in other workshops?
Do you have an idea for a workshop you'd like to see?